

July ‘21 Bulletin
CONTENTS
Swanage Regatta Results
Henley Women’s and Masters Regatta 2021
New Members
Building a Skiff
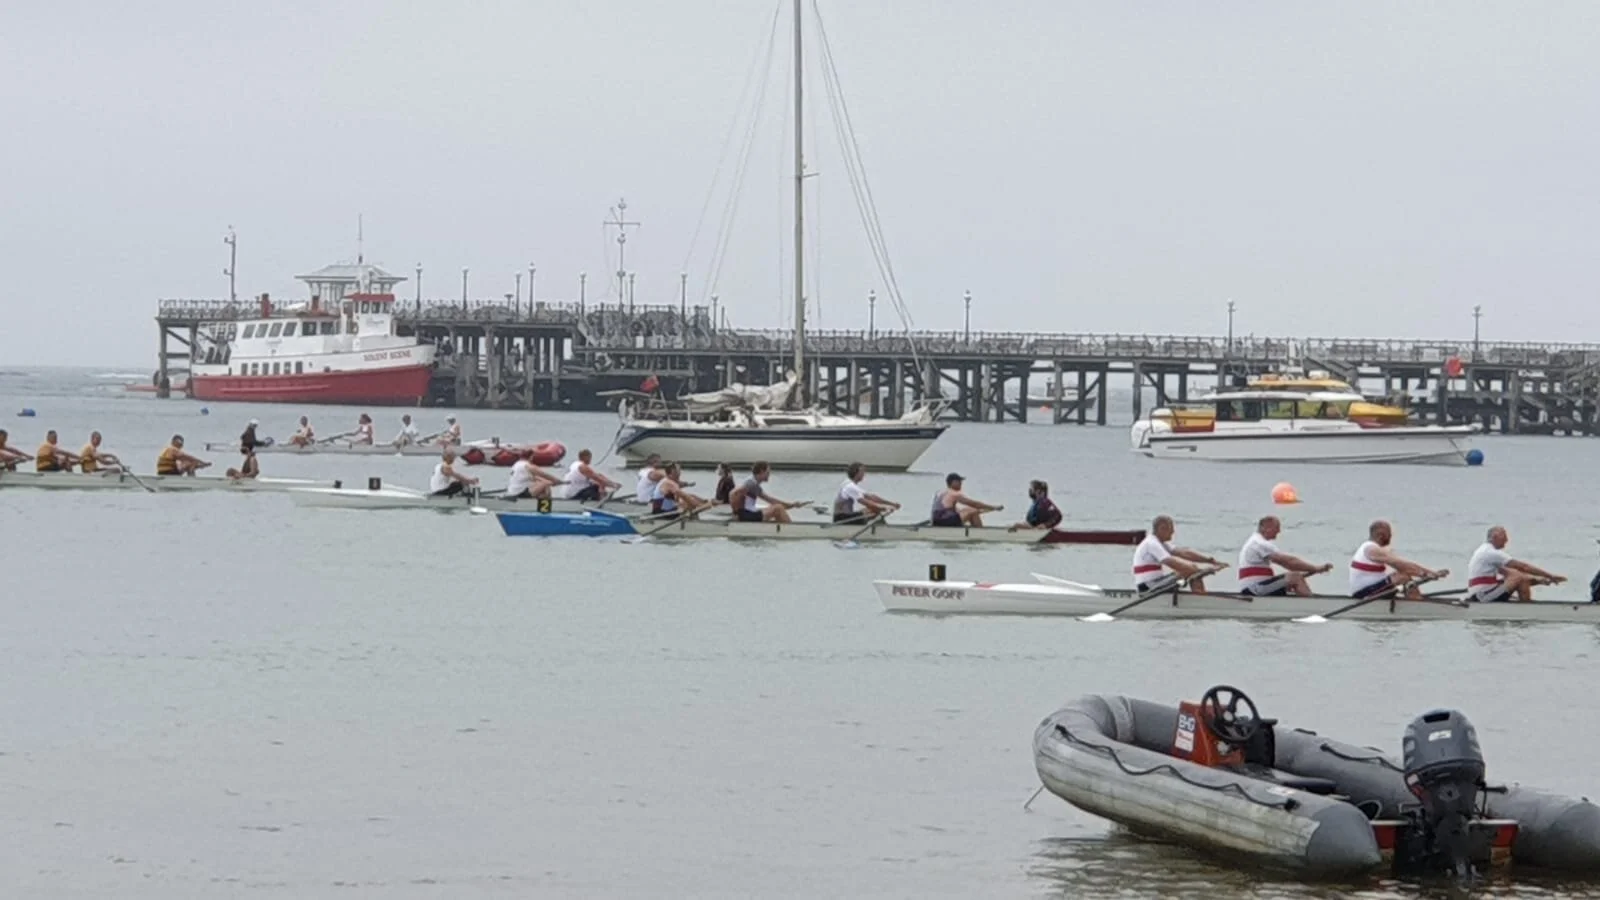
Swanage Regatta 2021
So fabulous to be back racing after so long… COVID isolation caused some last minute emergencies, but we finally made it ‘test negative’ to the beach with seven crews to compete…
Results as follows:
Men’s Masters 40 1st
Ladies Senior 3rd
Men’s Novice A 2nd
Men’s Novice B 5th in heat
Ladies Novice 4th
J16 boys 1st
J16 girls Quad- carbon quad blade snap DNF
Livvi Bull- Cox of the Day


Lena Mills- Silver Medallist at Henley Women’s Regatta

Lena, pictured here after winning the semi final in 6.01.00 and eventually finishing 2nd place in the final with a time of 5.52.60.
Superb.
Good luck to Tim Bull and Kenny Chalk at the Henley Masters event this weekend.
WELCOMING 23 New Members
Returning Ex LARC Members
Deb O’Dogherty
Nikki Penstone
Andrew Havard
Via Rowing Adventures Ltd Learn to Row
Sophie Boyd
Chris Scott Bowden
Sarah Gehlaar
Sarah Butters
Anna Tyson
Alison Longley
Lukas Perry
Lucy Webb
Maddie Curry
Salvador Myers
Reg Ogbert
JLARC
Alex Bellion
Tom Bellion
Tom Williams
Patrick McCabe
Henry Chisnall
Freya England
Rufus Rose
Issy Wakeley
Lexi Willford
…Pending
Maddie Duffin
Levena Contreras
Ted Ward
Max Miramont
Richard Marshall
Emma Hill
Sam Hill
Lisa Higgins
Clare Sherred
Building a Sculling Skiff
By David Gredley
I am one of the ‘Rowing Sailors’ who recently joined the LARC. Rather than using club boats I thought I’d have a go at building my own skiff and looked for a suitable design online. I found that there are many to choose from and I decided on Chesapeake’s Light craft’s Oxford Shell II. For those of you who’ve contemplated the idea of building your own boat you might be interested in hearing that it’s entirely feasible with even just average home woodworking tools and knowledge as I seek to explain.
At the Lyme Regis Boatbuilding School which I attended for nearly a year’s course in 2002 and where I started building and learning how to build my Nordic Folkboat ‘Lady Linda’, I remember one of our instructors, the great Jack Chippendale, advocating the advantages of the ‘stitch and glue’ boatbuilding process for small boats. The very expression ‘stitch and glue’ didn’t carry much appeal for me at the time, it sounded a bit ‘Micky Mouse’ especially compared to the established traditional boat building techniques we were being taught at the time. I was wrong to doubt it. Now I’ve built a rowing skiff using the stitch and glue technique I know that the method has a lot going for it. The technique was pioneered by boatbuilders such as Jack Chippendale and Ken Littledyke in the late 1950s. Many sailors will have sailed or even had a hand in building the ubiquitous Mirror Dinghy which was offered by TV’s DIY presenter Barry Bucknell and the famous boat designer and builder, Jack Holt all promoted by the Daily Mirror. The red sails were a nod to the Daily Mirror’s ‘red top’ reputation.
It all came together when last year I joined the Lymington Amateur Rowing Club and I’m learning how to scull properly in a quad which is four scullers and a cox. As an aside I have branched out into a single training scull and have become very interested in the concept of single sculling. Rowing is a fascinating sport involving precise technique and balance in propelling the boat as fast and efficiently as possible through the water at the
same time as steering facing the wrong way, I recommend it. Amateur rowing is a growing sport and indeed coastal sculling has been included as a new event in the 2028 Olympics. Rather than borrowing club boats, I thought it would be nice to have a boat of my own and I decided to build a single scull suitable for the Lymington River and the close inshore
Solent conditions. I researched what was around and found a wide range of various river and coastal sculling boats available in kit form, mainly from North East American designers. Having learnt how to build a boat from scratch using traditional techniques, I decided that it was unnecessarily expensive to go down the kit route and so I decided to buy the drawings and guidance manual of an Oxford Shell MkII which has been developed by Chesapeake Light Craft through their UK supplier, Fyne Boat Kits who are based in Kendal in the Lake District. Fyne Boats couldn’t have been more cooperative and helpful. Of course there is a significant cost saving over buying the entire kit, however the great advantage a kit has is that the various components comprising panels/planks, coamings etc. are laser cut precisely to shape, whereas with just the drawings and the manual, it is necessary to cut out the many shapes from drawings which takes quite a while as I describe below.
The Oxford Shell MkII has a length of 6.350M. and a beam of 0.533M. and weighs only 18 kgs. without the hardware which comprises the sliding seat, seat rails, outriggers etc. and so is a one person lift which means it is easily transported it on a car’s roof rack. I bought the required 3mm and 6mm top quality marine ply from Robbins Timber in Bristol and I bought the Epoxy and fibreglass matt and tape separately.
To envisage what the rowing shell comprises, think of a long cigar tube which is formed from six longitudinal planks forming the hull and the deck, all joined together along their long edges with an integral space formed just aft of midships for the cockpit. To form the shape which tapers at each end, the planks are laid inside seven upright moulds which are fixed on a long low construction table at precise stations along the boat’s length.
Step 1 is to join three 3mm. 8 foot x 4 foot ply boards to form lengths of ply 7.5M. long for the long planks using a 25mm scarf joint along the 4 foot edges of each boards. This is tricky as 3mm. ply is bendy and it is necessary to get the scarfs to fit evenly and precisely. I used Recorcinol marine glue to glue the scarfs. To work on, I needed a flat level table at around knee height. I built a long table around 7.5 M. long using 20mm. shuttering board clamped down to two sections of an aluminium ladder clamped down to trestles.
Step 2 is to lay the drawings on the ply and with a sharp point, prick the shapes through leaving dot/prick marks on the ply. Joining the dots gave the shape of each of the six planks which I cut out using a Japanese pull saw. This is a saw which cuts on the pull instead of the push as in traditional European saws, and so is ideal for following a pencil line in thin material. I tidied up the sawn edges with a low angle blade block plane. The low angle of the blade planes much more cleanly than a conventional plane. Of course the edges of each plank are joined at an angle to each other to form the shell’s cigar tube shape which requires a 45 degree bevel to be formed along the long edges, again I used a block plane to cut the bevels.
Adopting the same process, step 3 is to cut the seven moulds which each have a top and bottom half out of the 6mm ply which need not be marine grade as they are eventually discarded.
Step 4 is to similarly cut out the other structural parts of the shell from the ply, for example the cockpit deck, three bulkheads, cockpit coaming, forward coaming, skeg, transom, foot stretcher assembly.
The shell is constructed by separately building the top and bottom halves which are eventually joined together like a clam.
The top and bottom halves are built by fixing the planks inside the moulds which are fixed vertically and accurately on their precise stations on the construction table and then laying the planks which form the shell’s top and bottom halves so that their bevelled long edges are touching.
Then the magic begins. Step 5, 18 gauge copper wire stitches are used at approximately 50mm centres by threading the wire through pre-drilled small holes thus, stitching the edges together, first loosely until the edges are perfectly together and then tightly by twisting the copper wire using pliers. Thus, the chines are formed. To control the shape, the planks are similarly stitched to the moulds. An alternative to copper wire is to use thin cable ties, but they require slightly bigger predrilled holes and once the cable ties are tied they cannot then be loosened only tightened which is no good.
Step 6 is to spot weld the edges together using a Cyanoacrylate glue commonly known as ‘superglue’ with glue spots at approx 40mm. centres. Once the glue has cured in around 10 seconds, the copper wire stitches are removed and a fillet of thickened epoxy with the consistency of peanut butter, is applied to the inside of the spot welded planks. Wiping a neat even fillet of thickened epoxy is tricky. After a few mishaps, I eventually hit on an efficient process which is to first stick lengths of low tack masking tape around 15mm from each edge, thus controlling the spread of the fillet. After removing the tape the next step is to smooth off the fillet and to run a length of fibreglass tape along the seam which is wetted though with unthickened epoxy. The entire joining process from copper stitching to taping is shown in an illustrative mock up I made.
Step 7 is repeat this process for the top half of the shell. The two halves are stiffened in appropriate positions with seven bulkheads or stiffeners.
Step 8 is to join the top and bottom halves of the shell together like a clam which is when the fun starts. The top half is lined up with the bottom half so that all plank edges are meeting. Keeping the two halves separated with a 50mm gap using small blocks of wood, l
stitched together the top and bottom halves using loose stitches of copper wire again threaded at around 50mm centres. Once the top and bottom halves are lined up precisely, the loose copper wire stitches are gradually tightened bringing the edges of the two halves together whilst ensuring that the outside of the chines are perfectly lined up and flush. As before, the seams are spot welded with superglue and the copper wire stitches removed. It is not possible to reach in far enough to wipe a fillet of thickened epoxy on the insides of the now joined up shell.
Step 9 is to run fibreglass tape along the insides of the seams by soaking the tape in epoxy and pushing it along the insides of the seams whilst keeping the tape running as straight as possible. Once the wet tape has started its run it develops a mind of its own and is very difficult to get the tape back online if it wanders offline. I found using a stiff long lightweight push stick was the best method to tease the tape along. Time is of the essence here as the epoxy will start going off in about 20 minutes even at a low room temperature and even quicker if warmer.
Step 10 is to clean up the outsides of the newly formed chines between the planks and to proceed to construct the cockpit deck, foot stretcher, coaming, breakwater and stiffeners ready to receive the outriggers.
Step 11 is to fit the small transom and the skeg.
The whole construction is now stiff and the final step is to wrap the whole hull in fibreglass cloth a piece at a time by cutting the cloth to shape, laying it on a section of the hull and wetting the cloth through thus sticking it to the ply. Using peel ply helped give a flat surface to the epoxy. Peel ply is a thin shiny fabric which is rolled onto the epoxied fibre glass cloth whilst the epoxy is still wet and then peeled off after the epoxy has cured which leaves a flat more or less paintable surface.
Step 12 was to choose whether to paint or varnish the hull. I was not convinced that I’d achieved a sufficiently blemish good enough to varnish finish and so I decided to paint the hull with single pack polyurethane grey primer which made the long slender hull look like a torpedo.
The final construction is to make the foot rest and sliding seat. The sliding seat is a complex shape which I copied from an existing seat and I made one from a blank comprising glued together shapes of marine ply and applying several coats of clear epoxy.
I painted the boat Dark Blue and fitted her out with outriggers, sliding seat and foot board all from Neaves in Studland and who were very helpful indeed. I managed to find a pair if blades in very good condition which Pete kindly sold me. I’ve had around six tentative outings so far and she sculls like a dream and there are no leaks. It’s good to be sculling along in a self built vessel and if anyone is minded to have a go themselves, I’m very pleased to assist where I can.
David Gredley
June 2021


